I was so excited to see the huge pile of beautiful Ontario squash at my local grocery store last week. Like Ontario corn, squash makes me feel better about the end of summer. When choosing a squash, look for one that is heavy for its size and has no serious marks or gouges in the skin. Try pressing your fingernail into the skin. If it’s fairly hard, it’s ready. If you can mark it easily, try to find a firmer one. You can store the squash out of the fridge for a few weeks.
Spaghetti squash is easy to prepare and delicious. This is just one of the many ways you can enjoy it.
You’ll need:
1 spaghetti squash
4 cloves of garlic
1 tablespoon of butter (or margarine)
cooking spray (Pam?)
salt & pepper to taste
First, preheat your oven to 450 degrees F (I made my squash in a big toaster oven). Cut the squash in half the long way using the biggest, sharpest knife you have. Take the loose papery skin off of the garlic but don’t peel it. Spray a baking sheet with the cooking spray (you could also grease it with margarine or butter). Place the squash halves cut-side down on the pan and slip two cloves of garlic under each squash half. Bake the squash-garlic combo for about an hour, until you can pierce the skin easily with a fork.
When the squash is cooked, flip it onto its shell and butter each half. Then squeeze the roasted garlic out of its peel and mash it slightly with a fork. Spread the garlic onto both squash halves, then salt and pepper them lightly. Using a fork, fluff the squash so the spaghetti strands come apart. Taste and add more salt/pepper/butter as desired. You can serve it right in the squash halves for a cute fall dish.
You’ve probably heard how impossible pie crusts can be, or at least how easy it is to mess them up. I want to dispel these myths (or at least half-truths). You CAN make pie crust as long as you have a small amount of patience and a little bit of extra time. I think the results are worth it, and much better than pre-made pie crusts.
This is the first pie crust recipe I tried, and it worked so I’m sticking with it. A lot of people shun shortening, preferring the more classic butter pâte brisée. I started out with this recipe because I wanted something dairy-free. I also think the shortening is more forgiving than the butter, which is important if this is your first pie crust.
I’ve tried this recipe with regular and with golden shortening, and find that the golden shortening gives the crust a nicer flavour and colour. Keep your shortening in the fridge for best results. If you’re making a pie like apple or pumpkin you could also add some cinnamon and sugar to the flour mix for extra flavour.
For a single pie crust, you need:
1 1/3 cups of all-purpose flour
1/2 cup of cold shortening
1/2 teaspoon of salt
4 tablespoons of ice cold water (and possibly a bit extra)
Put the flour in a medium bowl along with the salt and stir. Cut off what you need from the brick of shortening and cut that into a couple of thick slices. Drop the shortening into the bowl with the flour.
I did some serious research before I tried to make my first pie, and learned that a pie crust is very different from other baked goods (cakes, muffins, cookies, etc.). When you make a pie crust, your goal is not to mix all of the ingredients thoroughly. Think of it more as coating all of the fat in flour. This also explains why it’s important to keep your shortening and water cold: If the shortening warms up too much it will become soft and liquidy and will mix too much with the flour (don’t panic, this has never actually happened to me, just explaining the “science” behind all this madness).
I like to keep things low-tech in the kitchen. Sure you can make this with a stand mixer or whatever, but who’s got one of those? Not me. If you don’t either, take one knife in each hand (just the normal ones you would use for dinner) and cut across the mixture in opposite directions at the same time, rotating the bowl and stirring so you cut up all the big lumps of shortening with your knife (cutting in the shortening). Keep going until the shortening chunks are about the size of a pea. When you bake the dough, these little pea-sized bits of shortening will melt, creating the flaky texture you’re aiming for.
The next step is to add the water. I always find I need more water than the recipe calls for, so use your judgment. Add the water one tablespoon at a time, stirring with the knives and trying to limit touching the dough with your hands (because of the whole warming up the shortening thing). When you have added 3 tablespoons of water, see if the dough is moist enough by squeezing it with your hand. If it holds together decently it’s probably ready. If not, add more water half a tablespoon at a time. It doesn’t have to be doughy, but just has to hold its shape a bit.
When you can form it into some sort of ball, do so. Don’t worry if there are a few little dry crumbly bits as long as most of it will hold its shape. Place a piece of plastic wrap on your counter and put the dough ball on it. Flatten the dough ball into a disc, wrap it up and place it in the fridge. It needs to sit for at least an hour to relax, which helps to make the crust more tender and flaky.
After the dough has rested for a while, unwrap it and place it on a well-floured surface. Roll out the dough with a well-floured rolling pin until it is about 1/4″ thick and about 2″ wider all around than your pie pan.
Here are two good ways to get your dough into the pie pan once it is rolled out:
1) (My favourite) Put one of those really thin and cheap bendy plastic cutting boards on your counter, sprinkle it generously (this is super important!) with flour and put a little extra on the counter in case the dough extends beyond the plastic sheet. Roll out the dough on top of the plastic sheet.
Lift up the plastic sheet and quickly flip it over onto the pie pan, then peel off the plastic sheet. Press the dough down into the pan. Easy, n’est-ce pas?
2) If you don’t have a cheap plastic cutting board but you do have a rolling pin, try this: Starting at one end of the dough circle, roll the dough around the pin, lift, place over pan and unroll. Also fairly easy.
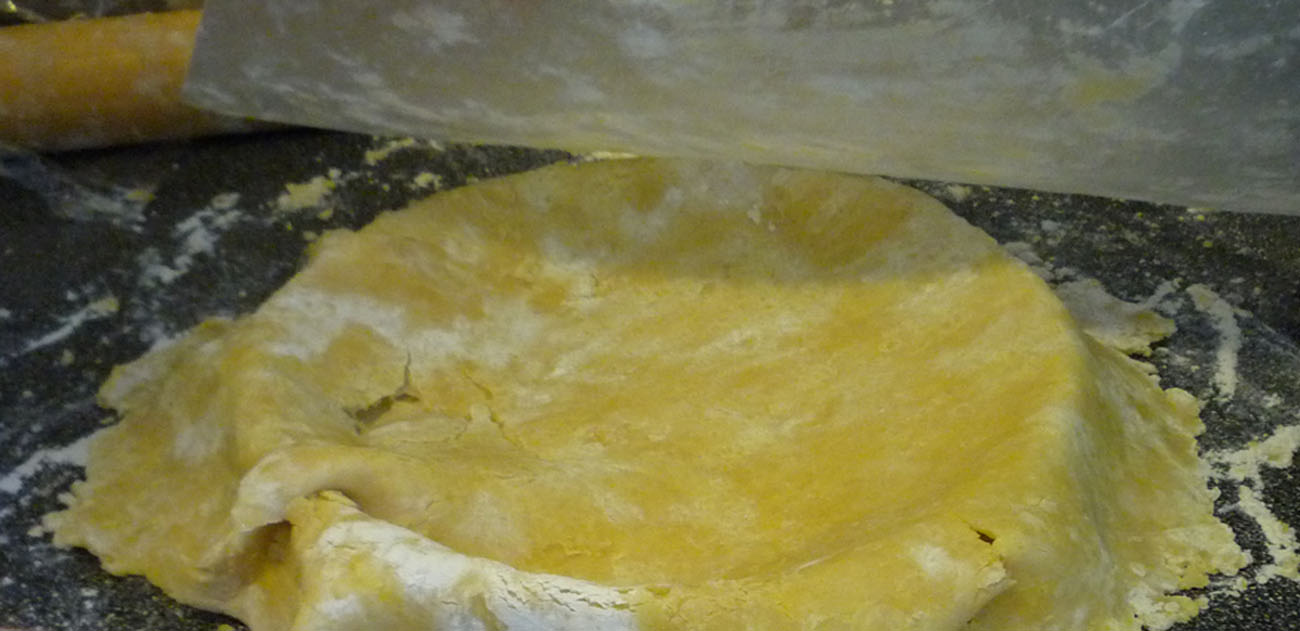
After you’ve pressed the dough down into the pan, tear off the extra dough so there is about an inch of dough to roll into a lip. Roll it up and press little divots into it with your finger. Don’t worry about making it perfect, it will look rustic and charming. If you have extra dough left over you can lay it on a cookie sheet and sprinkle it with cinnamon and sugar then bake for 10-12 minutes on 350F.
Some final notes: If the crust gets torn in the whole transferring to the pan process, just patch it up with some of the extra stuff torn off of the edges. The dough shouldn’t be sticky at all. If it is, sprinkle flour over it as you roll it out. Even if you think you’ve completely ruined it and are about to despair, don’t. Just add more water if it’s too dry or add more flour if it’s sticky and you’ll be fine. Hopefully everything worked out and your crust is flaky and delicious. As a friend of mine once said, “Now you can be known as a pie person!”
I don’t know if it’s obvious, but I’ve gone barbecue crazy this summer. Most of my grocery shopping revolves around grill-able things. Here’s something else you can try if you’re tired of burgers and hot dogs. I marinated my steaks overnight, so although it’s easy, it does take some planning ahead.
You need:
Grilling or marinating beef steak (I used sirloin)
A big container of some sort for marinating
Italian salad dressing (enough to cover the steaks)
First, get the steaks marinating. Pour a little salad dressing in the bottom of the container, drop the steaks in and let them sit overnight in the fridge. Turn them over once or twice if you can.
The next day, heat up your grill to a high temperature and drop the steak onto the grill, searing both sides over the high heat for about 1 minute on each side, then turn the heat down to medium and continue grilling (this is a tip from Cumbrae’s, the amazing butcher down the street from me).
When you think the steak is done to your liking, remove it from the grill and let it rest on a plate before serving so the juices won’t all run out when you cut it.
Bonus: If, like me, you happened to make way too much steak, try this idea for leftovers: Place the steak on a piece of aluminum foil and add a little bit more italian dressing on top. Wrap it up well in the foil and place it in a preheated toaster oven or oven for about 20 minutes at 300F. Serve with eggs any style and some toast for a hearty, greasy-spoon style breakfast.
This is a recipe straight from Italy that I learned while living in Milan last summer. The original recipe uses orecchiette, a kind of pasta that gets its name from its shape, like “little ears”. Tonight, though, I was craving gnocchi, so I tried that instead and it was almost as good. These two kinds of pasta work well because they go nicely with the mushy consistency of the sauce.
The picture shows the dish made with bacon, but I’ve also made it with thickly cut and cubed maple turkey breast (ask for about 3-1cm thick slices at the deli), pancetta, or no meat at all. All are excellent, depending on your tastes.
You need:
A bunch of broccoli (2 crowns)
1 kg of gnocchi or 500g of orecchiette
1/2 to 3/4 of a pack of bacon (or the turkey, or 10 or so slices of pancetta, or nothing)
2 tablespoons of olive oil
a pinch of chili flakes or powder (optional)
salt and pepper
If you’re using bacon, I suggest baking it. Preheat the oven to 400F. Cover a baking sheet with aluminum foil and set a wire rack on it. Lay the strips of bacon on the rack, trying not to overlap. Bake for about 20 minutes, then break into pieces once it’s crispy. If you’re using pancetta or turkey breast, pan-fry it to brown it.
While the bacon is cooking, cut up the broccoli (big pieces are alright). Bring a large pot of water to a boil (use a lot of water as it will be boiling for a long time). Boil the broccoli until it is very soft and falling apart, then salt the water lightly and add the pasta to the same pot. Gnocchi takes less time than orecchiette, so if you are using orecchiette you can add it a bit earlier in the cooking process but the broccoli should be very soft first.
Once the pasta is cooked, drain the whole works (broccoli and all). Put the broccoli and pasta back in the pot and stir in the olive oil, bacon and chili flakes (or powder). Add as much salt and pepper as you like. Buon appetito!
Another grilling idea! This is so easy that I wouldn’t even call it a recipe, but it will make you feel like you’re at your favourite sushi place. The frozen salmon steaks you can buy in a package (Highliner or Seaquest) are great for summer grilling. Take out as many steaks as you need (one per person is usually good) and drop in a bowl or container. Pour a generous amount of teriyaki sauce (Diana Marinade is good) over the salmon, turning the steaks to coat them. Leave it in the fridge overnight to defrost, turning a few times, then grill over medium heat the next day. It’s good on its own or served on a bed of rice.
As a student, August can be a bit of a downer. But with the end of summer coming too quickly, there is at least one bright spot: Ontario sweet corn. Find some at a farmers’ market near you or a roadside stand (where I got mine) for the ultimate in freshness, or find it at a grocery store and try one of these easy ways to prepare your corn. I suggest leaving it un-husked so you can keep your options open for cooking methods.
1. BBQ-ed Corn on the Cob
Pull off the outermost husk leaves and discard. Leave enough husk so that all of the kernels are covered. Peel back the remaining leaves but do not pull them off. Remove as much silk ask you can and replace the husk.
For the next part, I’ve heard mixed opinions as to whether or not you need to soak the corn. I haven’t tried it un-soaked yet, so I can’t weigh in, but I soaked my corn in water for 15 minutes.
Heat up the BBQ around medium and grill the corn for 10-15 minutes, turning a few times for even cooking. Peel back the husk and enjoy. I suggest spreading a bit of margarine or butter over the kernels after cooking and salting lightly. Mmm.
2. Boiled Corn on the Cob
This is easier and (I think) equally delicious. Peel off all husks and silk and toss corn into a large pot of lightly salted boiling water. Cover and cook for 10-15 minutes until kernels are tender. Again, I suggest spreading a bit of margarine or butter over the kernels after cooking and salting lightly.
If you’re like me, you may have wondered in the past who buys evaporated milk, and what they use it for. I was watching TV the other day and Rose Reisman was doing some kind of cooking segment. She said you can use evaporated milk in place of cream in any recipe! I’ve been patiently waiting to try this out and tonight was finally the night. The recipe that follows is for pappardelle (wider than fettucine and made with egg) alfredo with zucchini and mushrooms. You need:
1 1/2 cups of sliced mushrooms or so
1 1/2 zucchinis, cut in half lengthwise and sliced in semi-circles
4 cloves of garlic, minced
1/8 cup of butter
1 tablespoon of olive oil
250 grams of pappardelle pasta (long, wide egg noodles), or fettuccine, or whatever you have
1 can of evaporated milk (2% worked for me)
1/4 cup of grated parmesan or romano cheese
6 leaves of fresh basil, if you have it
3 tablespoons of salt
black pepper
pinch of nutmeg
Start with a big pan (you’ll end up tossing all of the pasta and sauce in it) and heat the olive oil. Add the sliced mushrooms and zucchini and cook over medium heat. Bring a large pot of water to a boil. When the mushrooms and zucchini are a bit soft, add half of the butter and all of the garlic. Salt the boiling pasta water (I use about a palm-full) and add the pasta.
Add the evaporated milk, parmesan or romano, and the rest of the butter to the veggies in the pan. Turn the heat up to high and bring this to a simmer, stirring often. The goal is to reduce it a bit so it becomes creamier. Drain the pasta when it is al dente.
When the sauce is a little bit less runny (about the same time the pasta is done), add the pepper, nutmeg and basil (I think the nutmeg and basil are totally optional). I have to say I thought my sauce was way too runny, but when I put it over the pasta it was perfect, so don’t worry. Drain the pasta and toss it in the pan with the sauce. Serve and feel good about yourself for using milk and not cream, and about half the butter called for in regular recipes. This serves 2 very hungry people with a bowl of leftovers for lunch.
Tonight I made calzoni. They’re basically giant homemade pizza pops. I started by making the dough using a recipe for pizza dough I’ve used a couple of times. If you don’t feel like making your own you can buy pre-made dough in the frozen foods section.
You will also need:
Tomato sauce (I used Ragu pasta sauce because that’s what I had)
Mozzarella cheese – about 1 1/2 cups to 2 cups, grated/shredded
Filling: I used about 6 mushrooms, sliced and a small zucchini
1 tbsp olive oil
Fresh basil leaves
Preheat the oven to 450 F.
Ok, so first you need to pre-cook the veggies. Heat the olive oil in a pan. Cut zucchini lengthwise and slice, and slice mushrooms too. Put them all in the pan and cook until soft.
If you’re making the dough, divide it into two balls. Take one ball of dough and stretch it by hand until it’s somewhat round and about 1/4″ thick. Spread tomato sauce on the circle of dough, leaving a one-inch perimeter. Next add half of the cheese to the circle. Now put the veggies on only half of the sauce/cheese-covered area and put basil leaves on top.
Fold the circle in half and pinch the edges to make a pocket. Then roll the edges up tightly so there won’t be any leaks. Repeat. Bake on a cookie sheet for 20-25 minutes until the crust is golden.
Ok…so I didn’t make this, but I tried it for the first time yesterday and it was amazing! If you like pesto, and you like ice cream, basil gelato is for you. I know it sounds strange, but it’s refreshing and delicious. I’ve only seen it at one gelateria so far here in Toronto (Vici Gelateria and Café, downstairs in the Toronto Life Square @ Yonge and Dundas), but if you come across it somewhere, give it a try!
I was baking cookies and looking for something quick to make between scooping dough onto the pan. This is pretty good as far as quick-ish one-dish meals go.
Ingredients (makes 2 big bowls, serves 2 fairly hungry people as a main dish):
200g of pasta (I used whole wheat rotini so it was heartier)
1 cup of frozen peas
1 pound (454g) sliced white mushrooms
3 tablespoons of pesto
3 tablespoons of olive oil
2 or 3 cloves of garlic, minced
salt and pepper to taste
Start by warming 2 tablespoons of the olive oil in a medium pan and bringing a large pot of water to a boil. Add the mushrooms to the pan and cook over medium-low. I like to cover them on-and-off so they cook faster.
When the mushrooms are about half cooked (looking mushy but still kind of fat), add the garlic. Then put about a palm-full of salt in the boiling water and add the pasta. Add the peas to the pasta for the last 5 minutes of cooking. Cook the pasta and the mushroom/garlic mix until both are done to your liking.
Drain the pasta/peas and put them back into the pot. Scoop the garlic/mushroom mix into the pot and stir. Add the pesto and the remaining olive oil (more if you like) and salt and pepper if you want and stir. Done!